> ## Documentation Index
> Fetch the complete documentation index at: https://www.activepieces.com/docs/llms.txt
> Use this file to discover all available pages before exploring further.
# SCIM with Okta
> Configure SCIM provisioning from Okta to Activepieces.
## Prerequisites
Before you start, make sure you have:
* **Admin access** to your Activepieces platform
* **Admin access** to your Okta tenant
* SSO already configured (recommended): [SAML with Okta](/admin-guide/guides/sso#saml-with-okta)
* Generated an API key from `/platform/security/api-keys` route in the Activepieces app
## Configure SCIM Connection in Okta
In Okta Admin Console, open your Activepieces application (created in [SSO step](/admin-guide/guides/sso#saml-with-okta)).
In the app's **General** tab, enable **SCIM Provisioning**.
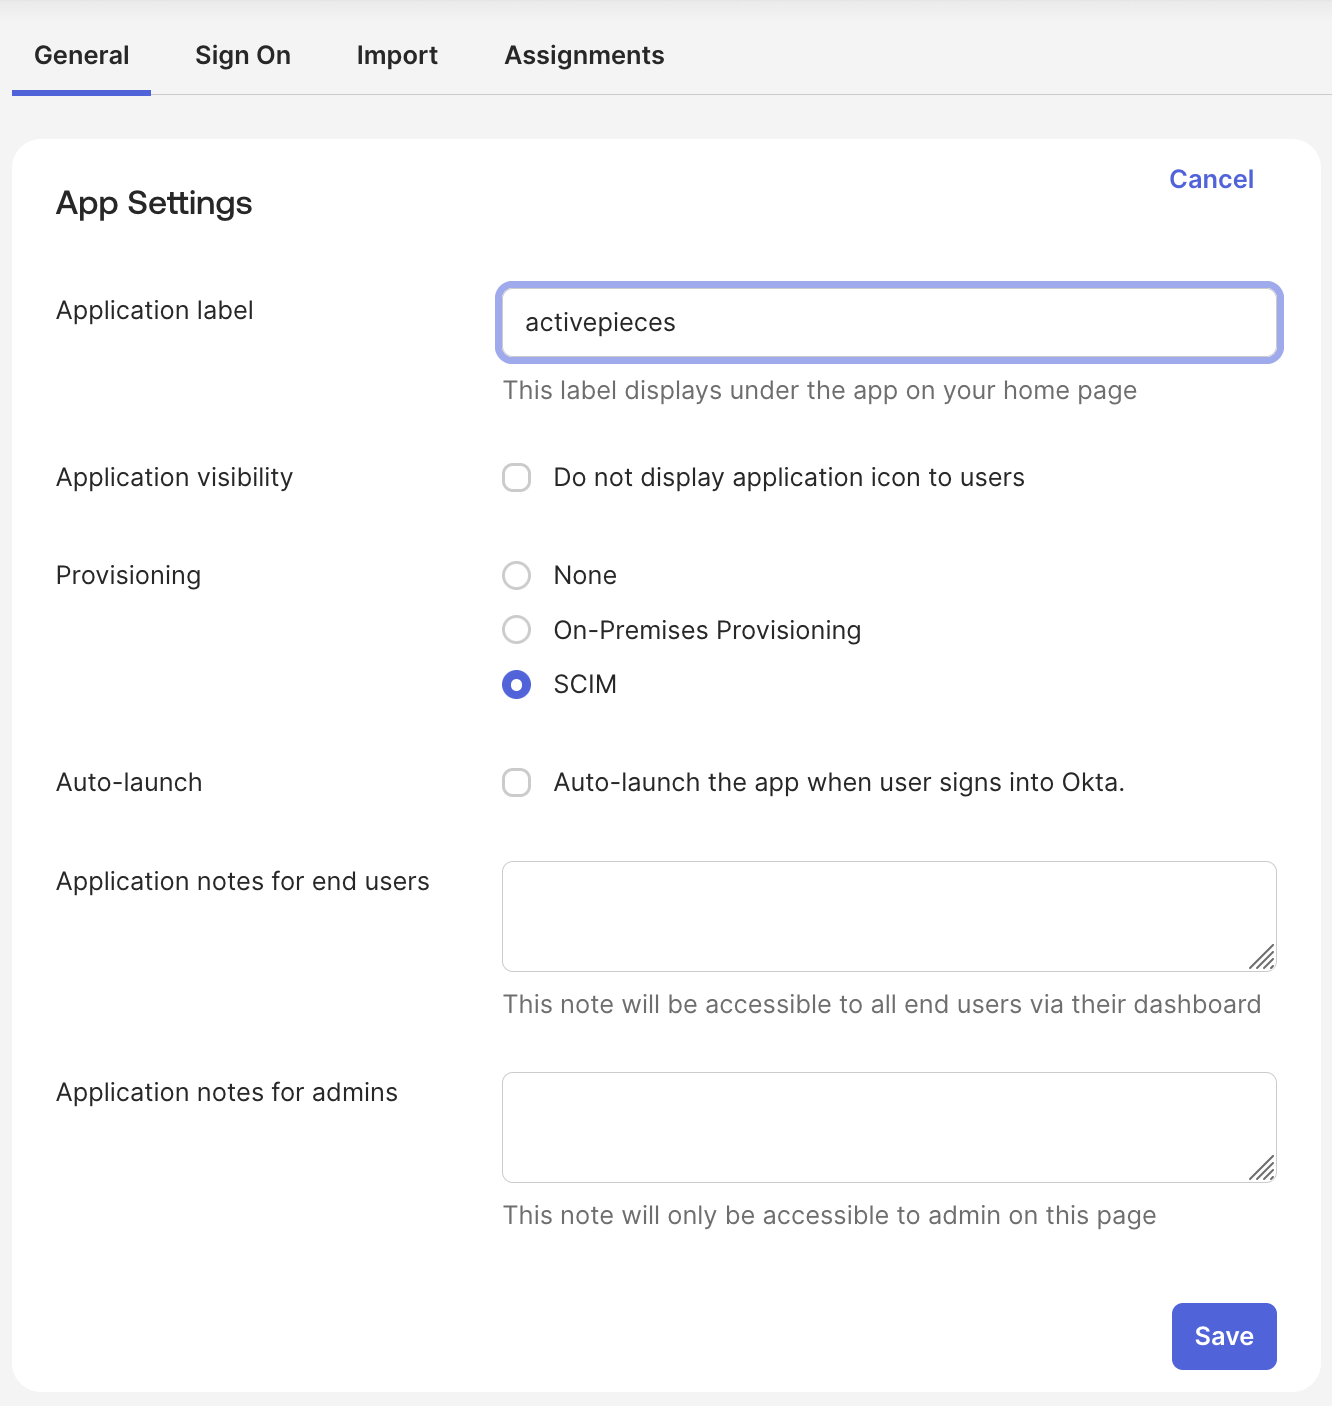 **Provisioning** will be visible, go to it and set:
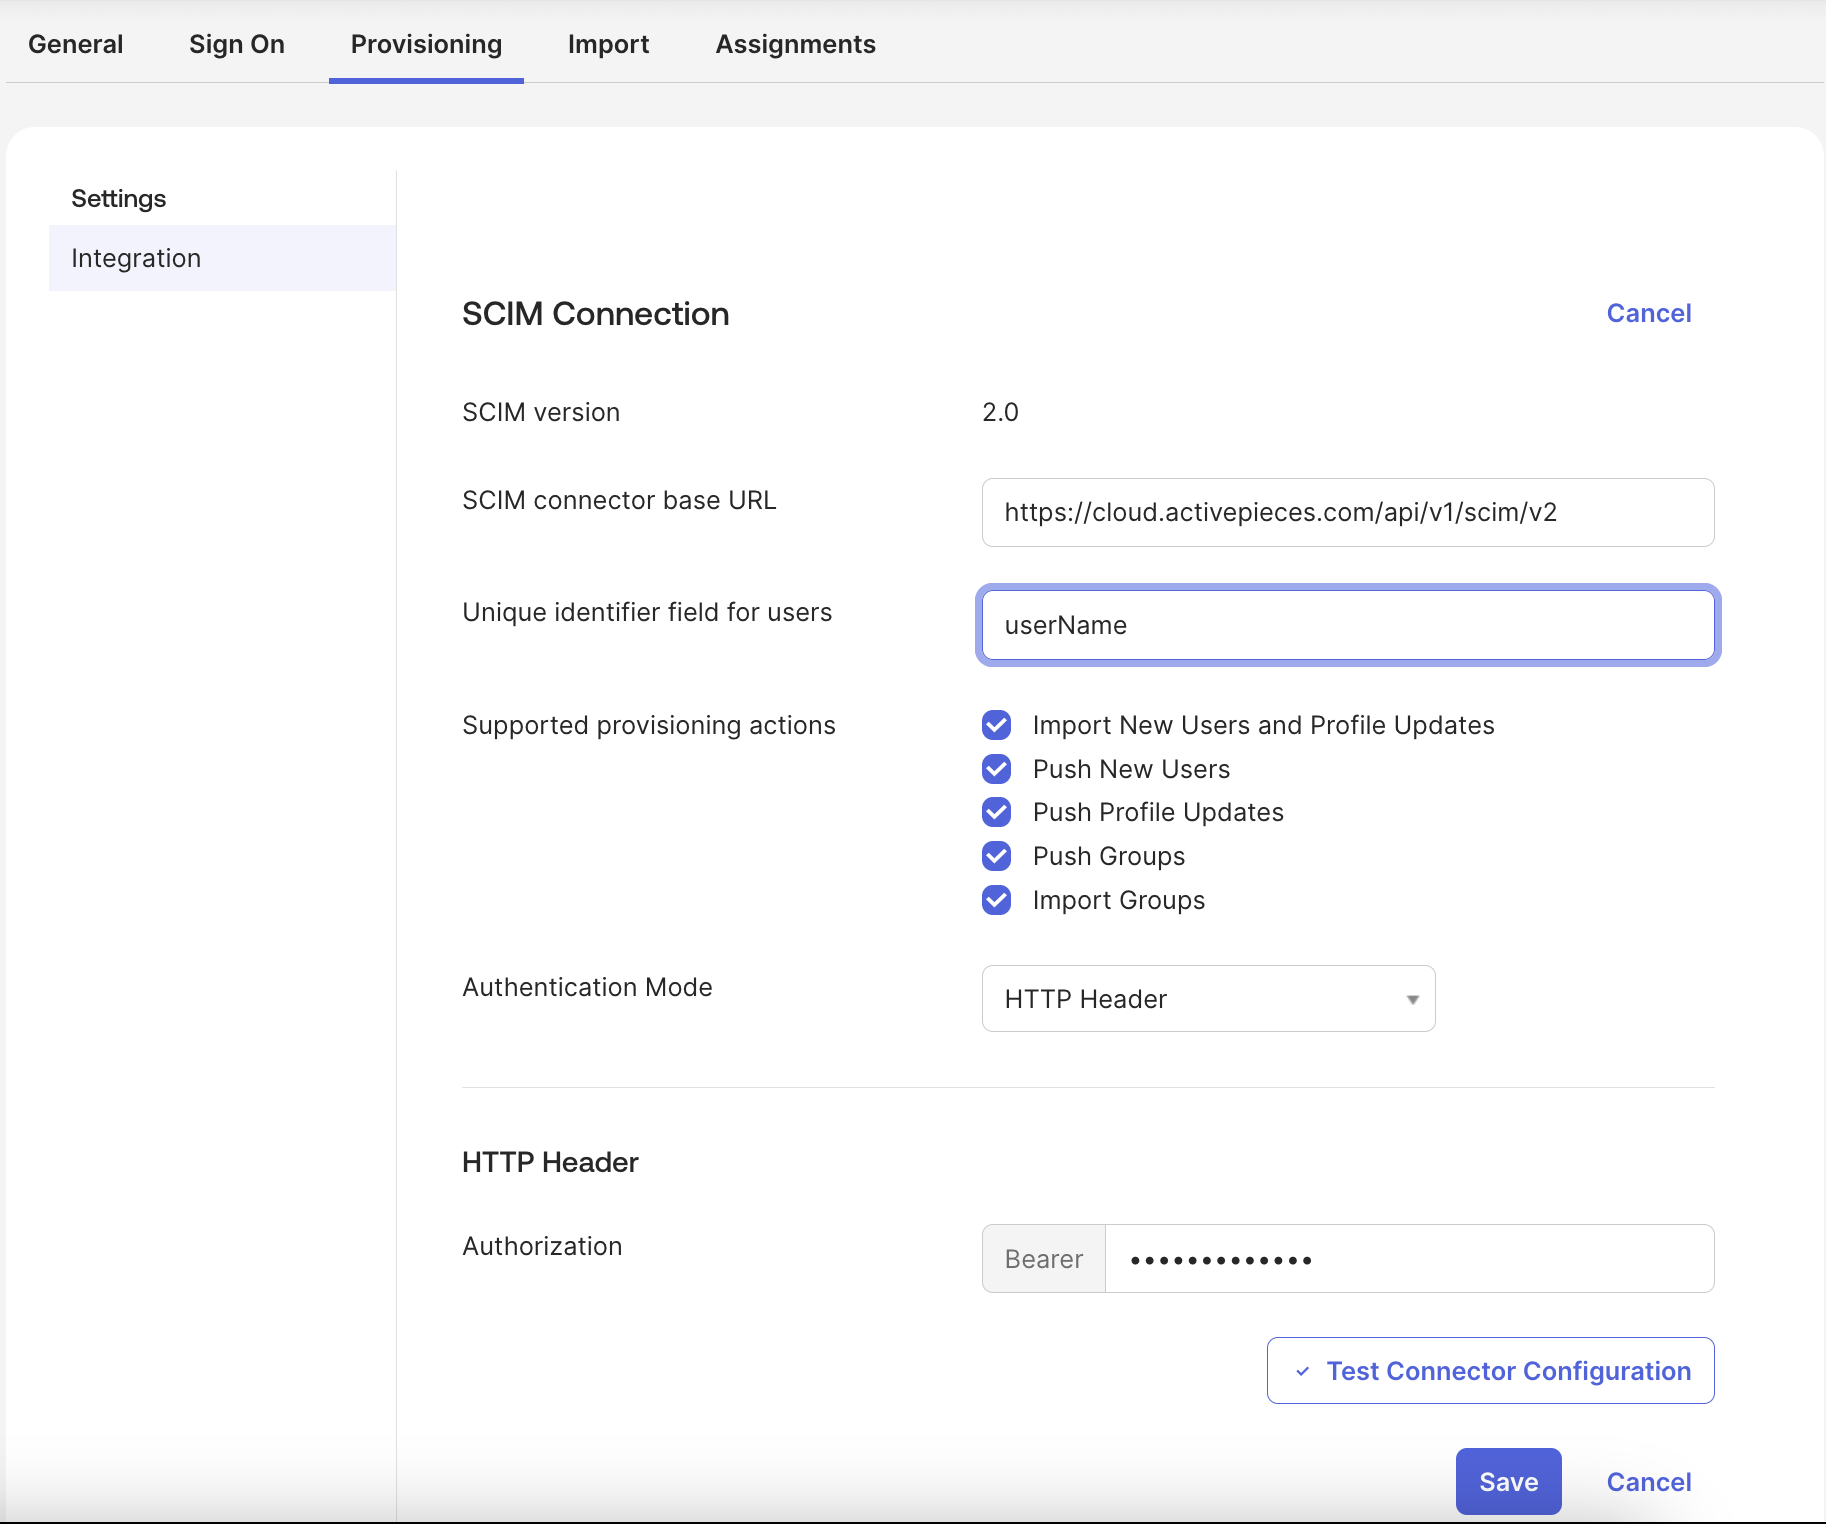
* **SCIM base URL** to `https://your-activepieces-domain/api/v1/scim/v2`
* **Unique identifier field** to `userName`
* **Authentication mode** to `HTTP Header`
* **Authorization** to `Bearer `
In Supported provisioning actions we support all **Push** actions
Click **Test Connector Configuration** and confirm the test passes.
**Provisioning** will be visible, go to it and set:
* **SCIM base URL** to `https://your-activepieces-domain/api/v1/scim/v2`
* **Unique identifier field** to `userName`
* **Authentication mode** to `HTTP Header`
* **Authorization** to `Bearer `
In Supported provisioning actions we support all **Push** actions
Click **Test Connector Configuration** and confirm the test passes.
 ## Configure Attribute Mapping
In **Provisioning -> To App -> Attribute Mappings**, map these fields:
| Activepieces (SCIM) | Okta Value |
| ------------------- | ------------------ |
| `userName` | `user.email` |
| `givenName` | `user.firstName` |
| `familyName` | `user.lastName` |
| `email` | `user.email` |
| `displayName` | `user.displayName` |
## Platform role mapping
By default, provisioned users will have `Member` role in the platform. In order to specify roles for users in Okta, follow these steps:
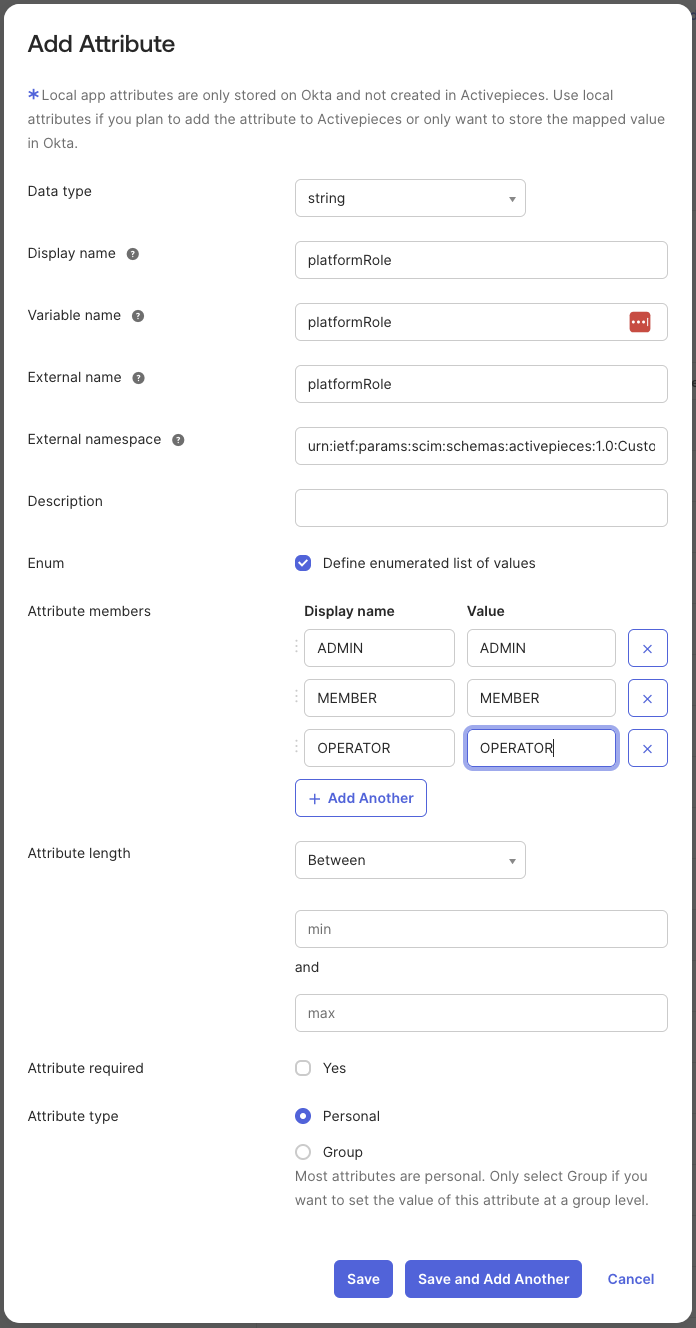
In Okta admin console, navigate to **Directory -> Profile Editor -> Your-Application User**.
Click **Add Attribute** and fill form with:
| Field | Value |
| -------------------- | -------------------------------------------------------------------- |
| `Display name` | `platformRole` |
| `Variable name` | `platformRole` |
| `External name` | `platformRole` |
| `External namespace` | `urn:ietf:params:scim:schemas:activepieces:1.0:CustomUserAttributes` |
| `Enum` | `enabled` |
For **Attribute members**, add:
| Display name | Value |
| ------------ | ---------- |
| `ADMIN` | `ADMIN` |
| `MEMBER` | `MEMBER` |
| `OPERATOR` | `OPERATOR` |
## Configure Attribute Mapping
In **Provisioning -> To App -> Attribute Mappings**, map these fields:
| Activepieces (SCIM) | Okta Value |
| ------------------- | ------------------ |
| `userName` | `user.email` |
| `givenName` | `user.firstName` |
| `familyName` | `user.lastName` |
| `email` | `user.email` |
| `displayName` | `user.displayName` |
## Platform role mapping
By default, provisioned users will have `Member` role in the platform. In order to specify roles for users in Okta, follow these steps:
In Okta admin console, navigate to **Directory -> Profile Editor -> Your-Application User**.
Click **Add Attribute** and fill form with:
| Field | Value |
| -------------------- | -------------------------------------------------------------------- |
| `Display name` | `platformRole` |
| `Variable name` | `platformRole` |
| `External name` | `platformRole` |
| `External namespace` | `urn:ietf:params:scim:schemas:activepieces:1.0:CustomUserAttributes` |
| `Enum` | `enabled` |
For **Attribute members**, add:
| Display name | Value |
| ------------ | ---------- |
| `ADMIN` | `ADMIN` |
| `MEMBER` | `MEMBER` |
| `OPERATOR` | `OPERATOR` |
 Finally click save.
This step assumes that you already have a field in the Okta user profile that you can map to platformRole in your Activepieces user profile. If you don't have one, you can create a new field in **Directory -> Profile Editor -> User (default)**.
* Back to your Activepieces application page in **Provisioning -> To App -> Attribute Mappings**
* Scroll down and click **Show Unmapped Attributes**
* Edit `platformRole` field
* Here you need to map the attribute value from your Okta user profile. If you already have a role field in the Okta user profile that matches exactly with a platformRole value (`ADMIN`, `MEMBER`, `OPERATOR`) then you can select it directly with `Map from Okta Profile` option, otherwise you can use an [Expression](https://developer.okta.com/docs/reference/okta-expression-language/) to return one of the 3 roles based on other fields in the Okta user profile.
Here is an example of an expression:
Finally click save.
This step assumes that you already have a field in the Okta user profile that you can map to platformRole in your Activepieces user profile. If you don't have one, you can create a new field in **Directory -> Profile Editor -> User (default)**.
* Back to your Activepieces application page in **Provisioning -> To App -> Attribute Mappings**
* Scroll down and click **Show Unmapped Attributes**
* Edit `platformRole` field
* Here you need to map the attribute value from your Okta user profile. If you already have a role field in the Okta user profile that matches exactly with a platformRole value (`ADMIN`, `MEMBER`, `OPERATOR`) then you can select it directly with `Map from Okta Profile` option, otherwise you can use an [Expression](https://developer.okta.com/docs/reference/okta-expression-language/) to return one of the 3 roles based on other fields in the Okta user profile.
Here is an example of an expression:
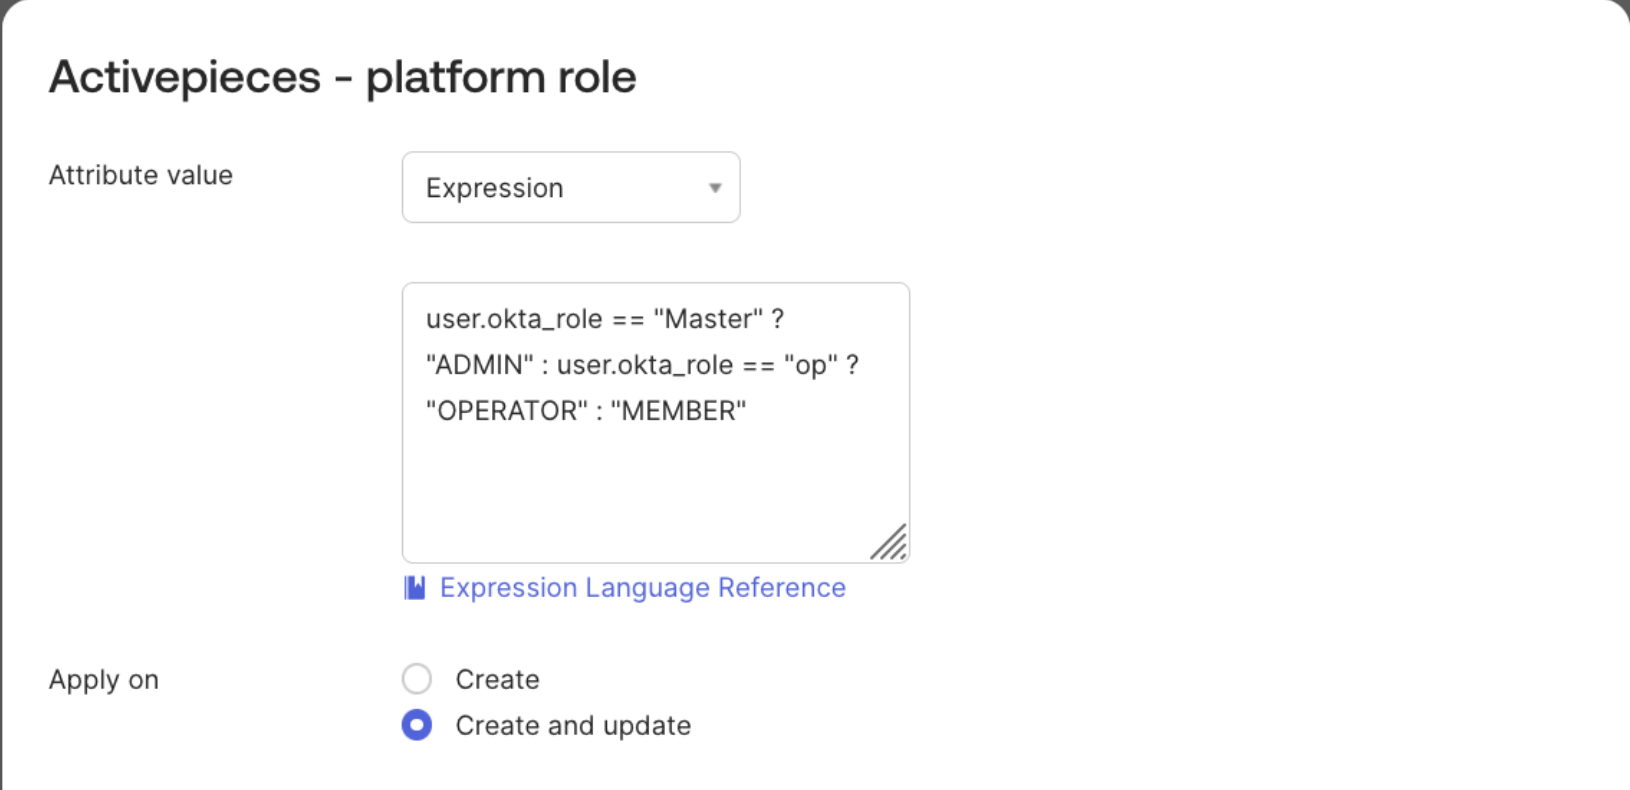 Please make sure the return value to always be one of `ADMIN`, `MEMBER` or `OPERATOR`
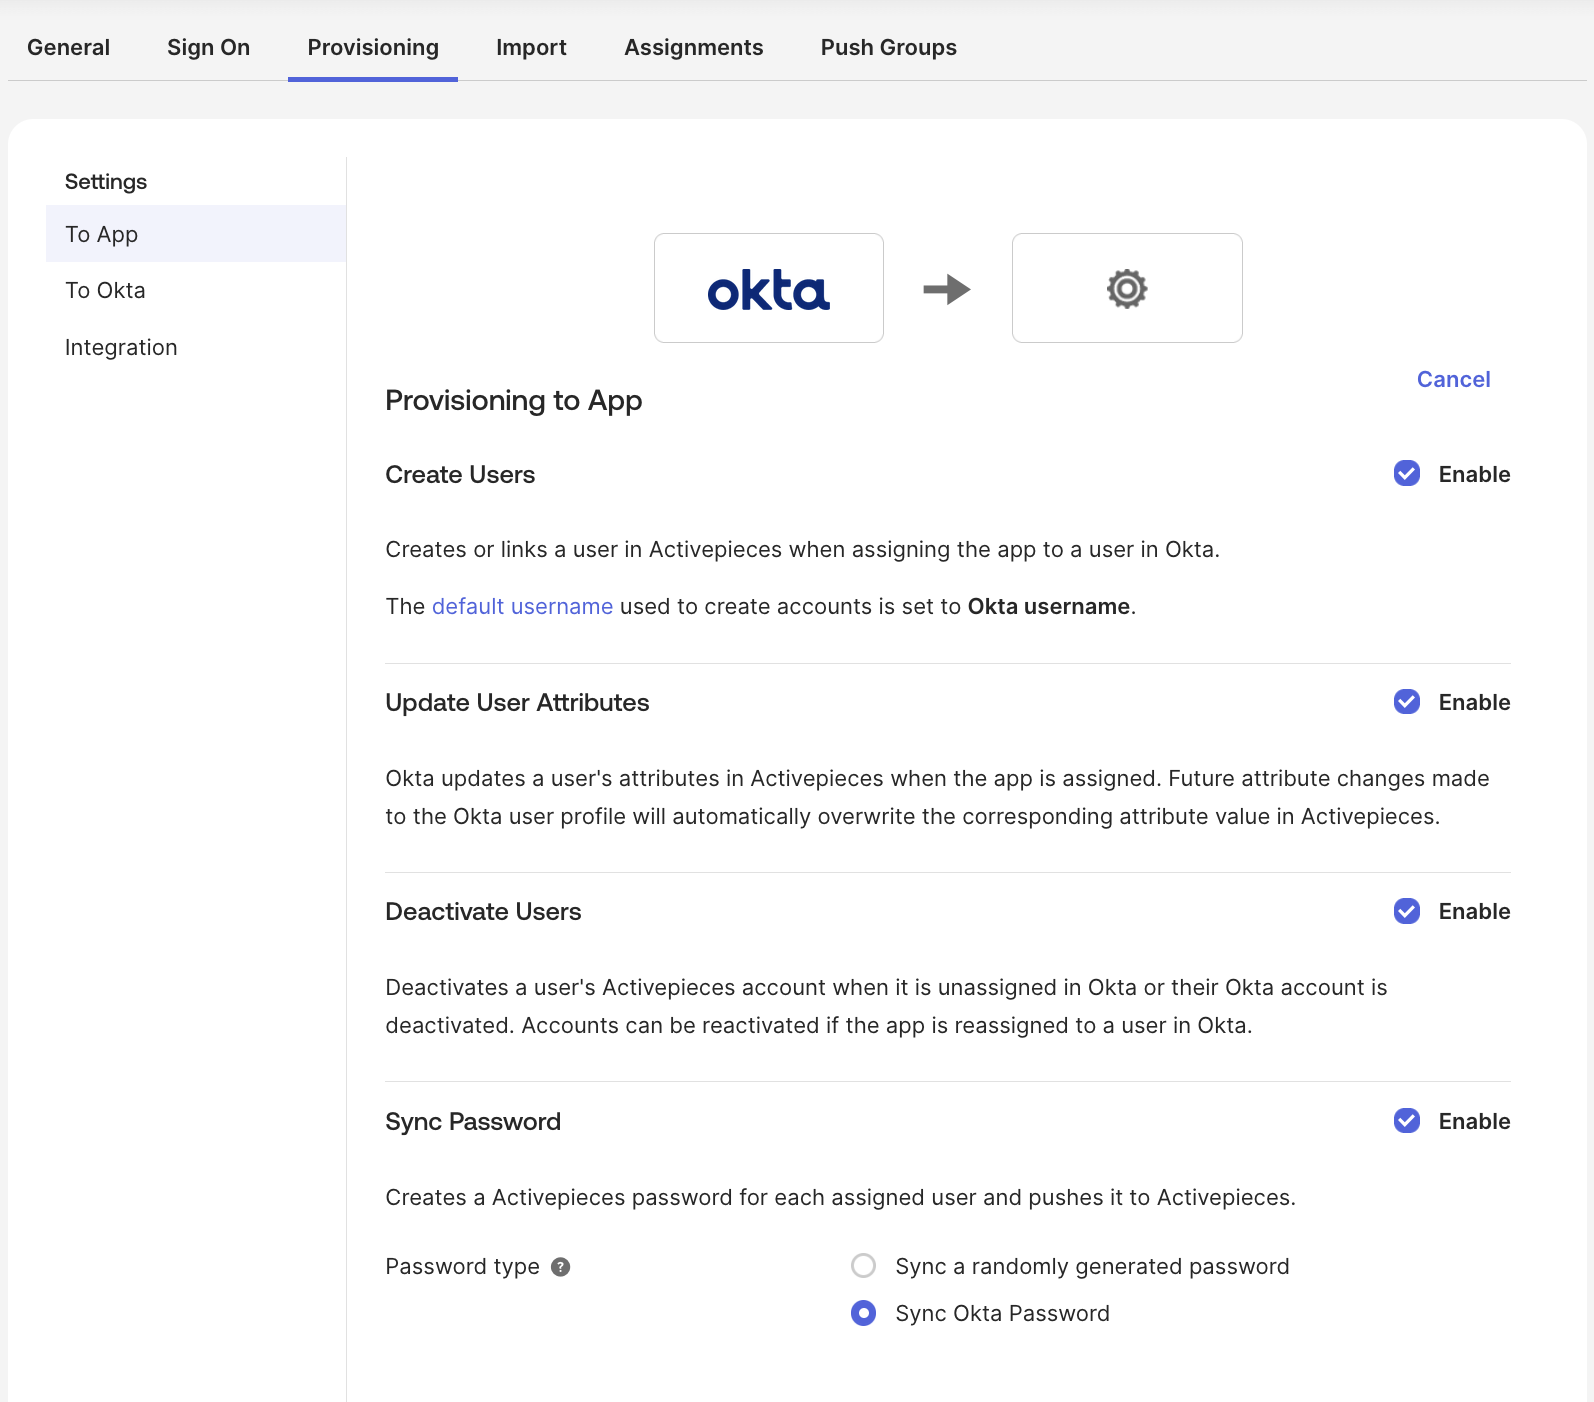
## Provision and Deprovision Users
### Provision
In the Activepieces application page, go to **Provisioning -> To App** and enable the actions you want to be applied to Activepieces when changes occur in Okta.
Please make sure the return value to always be one of `ADMIN`, `MEMBER` or `OPERATOR`
## Provision and Deprovision Users
### Provision
In the Activepieces application page, go to **Provisioning -> To App** and enable the actions you want to be applied to Activepieces when changes occur in Okta.
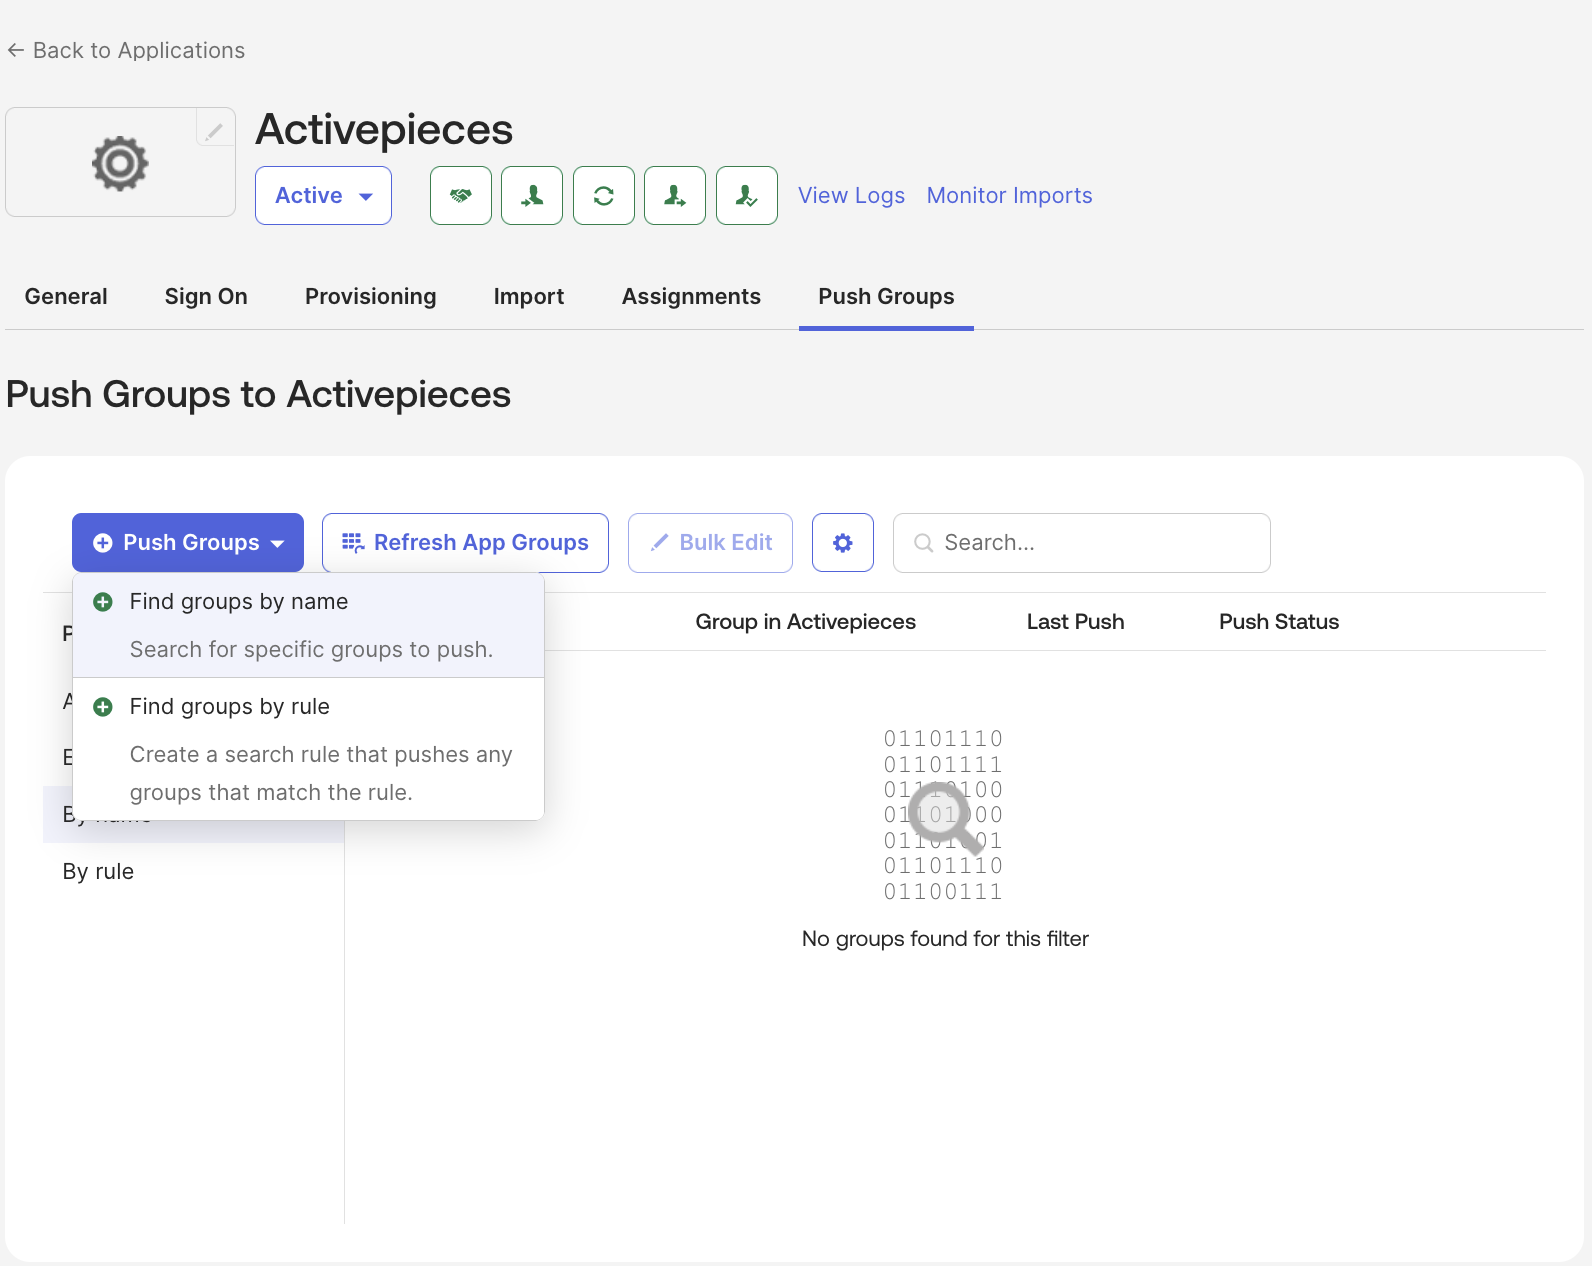
 Now in the **Assignments** tab you can:
* Choose to provision individual users or groups. Note that groups in Okta will be projects in Activepieces.
* In case you don't have groups and you want to provision your Okta users at once, you can assign the `Everyone` group.
* When editing/creating users in an assigned group (including `Everyone`), they should be updated in Activepieces.
* To push groups to Activepieces, go to the **Push groups** tab and click on the push button, find the group and save.
Default role for users in projects will be `Editor` role, right now there is no way to link the project role with Okta
Now in the **Assignments** tab you can:
* Choose to provision individual users or groups. Note that groups in Okta will be projects in Activepieces.
* In case you don't have groups and you want to provision your Okta users at once, you can assign the `Everyone` group.
* When editing/creating users in an assigned group (including `Everyone`), they should be updated in Activepieces.
* To push groups to Activepieces, go to the **Push groups** tab and click on the push button, find the group and save.
Default role for users in projects will be `Editor` role, right now there is no way to link the project role with Okta
 Created users in Activepieces will receive a welcome email. When clicked, they will be redirected to sign in with `SAML`.
### Deprovision
Users' state switches to `INACTIVE` in Activepieces only when they are deactivated in Okta. Suspension or deletion in Okta does not reflect in Activepieces because of Okta's design.
For groups you can delete them in **Push groups** tab -> click on button in **Push Status** column -> Unlink pushed group -> Delete the group in target
Deleting a group will delete the whole project in Activepieces with its flows and connections. Users linked to that group won't be affected.
## Troubleshooting
* Confirm SCIM base URL is correct.
* Ensure the `Authorization` header uses `Bearer` format.
* Ensure users are assigned to the Okta app.
* Confirm provisioning actions are enabled in Okta.
* Recheck mappings in **Provisioning -> To App**.
* Ensure `userName` uses a stable unique value (usually email).
Created users in Activepieces will receive a welcome email. When clicked, they will be redirected to sign in with `SAML`.
### Deprovision
Users' state switches to `INACTIVE` in Activepieces only when they are deactivated in Okta. Suspension or deletion in Okta does not reflect in Activepieces because of Okta's design.
For groups you can delete them in **Push groups** tab -> click on button in **Push Status** column -> Unlink pushed group -> Delete the group in target
Deleting a group will delete the whole project in Activepieces with its flows and connections. Users linked to that group won't be affected.
## Troubleshooting
* Confirm SCIM base URL is correct.
* Ensure the `Authorization` header uses `Bearer` format.
* Ensure users are assigned to the Okta app.
* Confirm provisioning actions are enabled in Okta.
* Recheck mappings in **Provisioning -> To App**.
* Ensure `userName` uses a stable unique value (usually email).