> ## Documentation Index
> Fetch the complete documentation index at: https://www.activepieces.com/docs/llms.txt
> Use this file to discover all available pages before exploring further.
# How to Setup SSO
> Configure Single Sign-On (SSO) to enable secure, centralized authentication for your Activepieces platform
## Overview
Single Sign-On (SSO) allows your team to authenticate using your organization's existing identity provider, eliminating the need for separate Activepieces credentials. This improves security, simplifies user management, and provides a seamless login experience.
## Prerequisites
Before configuring SSO, ensure you have:
* **Admin access** to your Activepieces platform
* **Admin access** to your identity provider (Google, GitHub, Okta, or JumpCloud)
* The **redirect URL** from your Activepieces SSO configuration screen
## Accessing SSO Configuration
Navigate to **Platform Settings** → **SSO** in your Activepieces admin dashboard to access the SSO configuration screen.
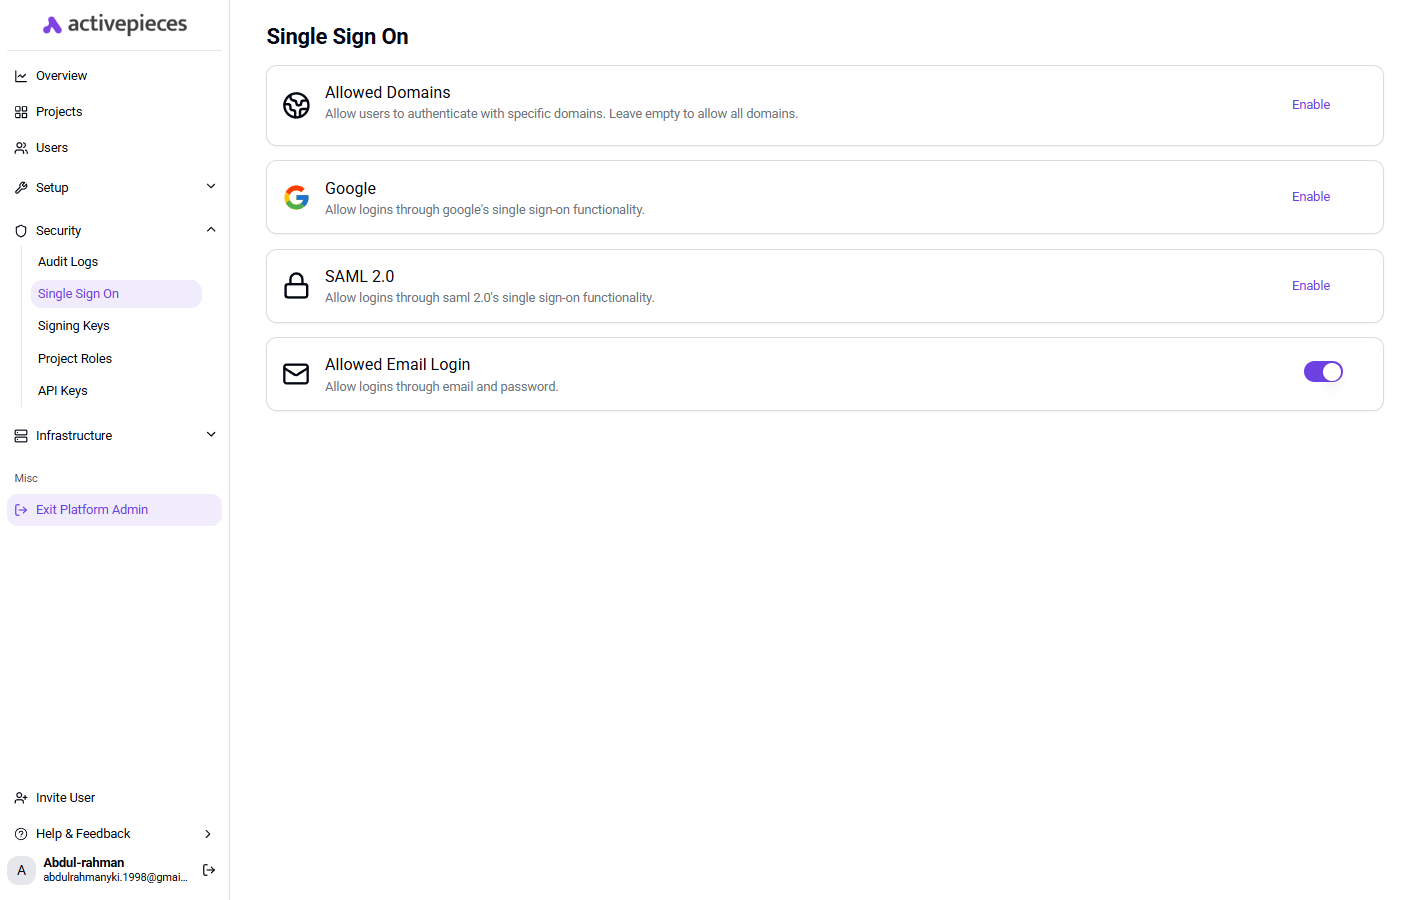 ## Enforcing SSO
You can enforce SSO by specifying your organization's email domain. When SSO enforcement is enabled:
* Users with matching email domains must authenticate through the SSO provider
* Email/password login can be disabled for enhanced security
* All authentication is routed through your designated identity provider
We recommend testing SSO with a small group of users before enforcing it organization-wide.
## SSO Domain
The **SSO Domain** lets you map a public domain (e.g. `acme.com`) to your platform's SAML provider so users can discover the right IdP from the shared sign-in page.
You can set it in the SAML configuration dialog (**Platform Settings → SSO → SAML 2.0 → Enable**), in the **SSO Domain** field. Leave it empty to disable domain-based discovery.
**How it works on Cloud**
On the cloud sign-in page, clicking **Sign in with SAML** opens a dialog asking the user for their organization's domain. When they enter `acme.com`, the platform whose SSO Domain matches is looked up and the user is redirected to that platform's identity provider.
**Constraints**
* Must be a valid public hostname containing a dot (e.g. `acme.com`, not `acme`).
* Each domain can be claimed by only one platform on Cloud.
On self-hosted Enterprise instances the SAML button on the sign-in page redirects directly to the configured identity provider, so the **SSO Domain** field is effectively ignored at login. You can still leave it empty.
## Supported SSO Providers
Activepieces supports multiple SSO providers to integrate with your existing identity management system.
### Google
Go to the [Google Cloud Console](https://console.cloud.google.com/) and select your project (or create a new one).
Navigate to **APIs & Services** → **Credentials** → **Create Credentials** → **OAuth client ID**.
Select **Web application** as the application type.
Copy the **Redirect URL** from the Activepieces SSO configuration screen and add it to the **Authorized redirect URIs** in Google Cloud Console.
Copy the **Client ID** and **Client Secret** from Google and paste them into the corresponding fields in Activepieces.
Click **Finish** to complete the setup.
### GitHub
Go to [GitHub Developer Settings](https://github.com/settings/developers) → **OAuth Apps** → **New OAuth App**.
Fill in the application details:
* **Application name**: Choose a recognizable name (e.g., "Activepieces SSO")
* **Homepage URL**: Enter your Activepieces instance URL
Copy the **Redirect URL** from the Activepieces SSO configuration screen and paste it into the **Authorization callback URL** field.
Click **Register application** to create the OAuth App.
After registration, click **Generate a new client secret** and copy it immediately (it won't be shown again).
Copy the **Client ID** and **Client Secret** and paste them into the corresponding fields in Activepieces.
Click **Finish** to complete the setup.
### SAML with Okta
Go to the [Okta Admin Portal](https://login.okta.com/) → **Applications** → **Create App Integration**.
Choose **SAML 2.0** as the sign-on method and click **Next**.
Enter an **App name** (e.g., "Activepieces") and optionally upload a logo. Click **Next**.
* **Single sign-on URL**: Copy the SSO URL from the Activepieces configuration screen
* **Audience URI (SP Entity ID)**: Enter `Activepieces`
* **Name ID format**: Select `EmailAddress`
Add the following attribute mappings:
| Name | Value |
| ----------- | ---------------- |
| `firstName` | `user.firstName` |
| `lastName` | `user.lastName` |
| `email` | `user.email` |
Click **Next**, select the appropriate feedback option, and click **Finish**.
Go to the **Sign On** tab → **View SAML setup instructions** or **View IdP metadata**. Copy the Identity Provider metadata XML.
* Paste the **IdP Metadata** XML into the corresponding field
* Copy the **X.509 Certificate** from Okta and paste it into the **Signing Key** field
* (Optional, Cloud) Set the **SSO Domain** to your organization's public domain (e.g. `acme.com`) so users can sign in by entering it on the cloud sign-in page. See [SSO Domain](#sso-domain) above.
Click **Save** to complete the setup.
### SAML with Microsoft Entra ID (Azure AD)
Go to the [Azure Portal](https://portal.azure.com/) → **Microsoft Entra ID** → **Enterprise applications** → **New application** → **Create your own application**.
Name it (e.g., "Activepieces") and select **Integrate any other application you don't find in the gallery (Non-gallery)**.
Open the application → **Single sign-on** → select **SAML**.
Edit **Basic SAML Configuration**:
* **Identifier (Entity ID)**: `Activepieces`
* **Reply URL (Assertion Consumer Service URL)**: paste the SSO URL from the Activepieces configuration screen
Edit **Attributes & Claims** and add these additional claims (leave **Namespace** empty):
| Claim name | Source attribute |
| ----------- | ---------------- |
| `firstName` | `user.givenname` |
| `lastName` | `user.surname` |
| `email` | `user.mail` |
In the **SAML Certificates** section, copy the **App Federation Metadata Url**.
You can paste this URL directly into the **IdP Metadata** field in Activepieces — Activepieces will fetch the metadata XML automatically. Alternatively, open the URL in a browser, save the XML, and paste its contents.
Download the **Certificate (Base64)** from the **SAML Certificates** section. Open the file and copy its contents (including the `-----BEGIN CERTIFICATE-----` / `-----END CERTIFICATE-----` markers) into the **Signing Key** field in Activepieces.
Go to **Users and groups** in the application and assign the users or groups that should be allowed to sign in.
Click **Save** in Activepieces to complete the setup.
### SAML with JumpCloud
Go to the [JumpCloud Admin Portal](https://console.jumpcloud.com/) → **SSO Applications** → **Add New Application** → **Custom SAML App**.
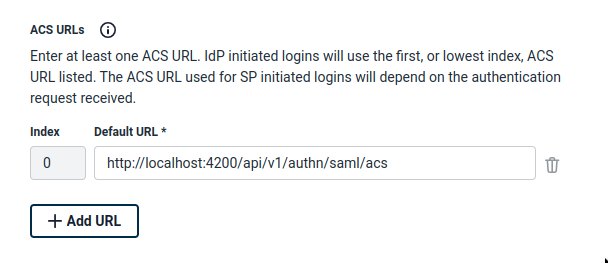
Copy the **ACS URL** from the Activepieces configuration screen and paste it into the **ACS URLs** field in JumpCloud.
## Enforcing SSO
You can enforce SSO by specifying your organization's email domain. When SSO enforcement is enabled:
* Users with matching email domains must authenticate through the SSO provider
* Email/password login can be disabled for enhanced security
* All authentication is routed through your designated identity provider
We recommend testing SSO with a small group of users before enforcing it organization-wide.
## SSO Domain
The **SSO Domain** lets you map a public domain (e.g. `acme.com`) to your platform's SAML provider so users can discover the right IdP from the shared sign-in page.
You can set it in the SAML configuration dialog (**Platform Settings → SSO → SAML 2.0 → Enable**), in the **SSO Domain** field. Leave it empty to disable domain-based discovery.
**How it works on Cloud**
On the cloud sign-in page, clicking **Sign in with SAML** opens a dialog asking the user for their organization's domain. When they enter `acme.com`, the platform whose SSO Domain matches is looked up and the user is redirected to that platform's identity provider.
**Constraints**
* Must be a valid public hostname containing a dot (e.g. `acme.com`, not `acme`).
* Each domain can be claimed by only one platform on Cloud.
On self-hosted Enterprise instances the SAML button on the sign-in page redirects directly to the configured identity provider, so the **SSO Domain** field is effectively ignored at login. You can still leave it empty.
## Supported SSO Providers
Activepieces supports multiple SSO providers to integrate with your existing identity management system.
### Google
Go to the [Google Cloud Console](https://console.cloud.google.com/) and select your project (or create a new one).
Navigate to **APIs & Services** → **Credentials** → **Create Credentials** → **OAuth client ID**.
Select **Web application** as the application type.
Copy the **Redirect URL** from the Activepieces SSO configuration screen and add it to the **Authorized redirect URIs** in Google Cloud Console.
Copy the **Client ID** and **Client Secret** from Google and paste them into the corresponding fields in Activepieces.
Click **Finish** to complete the setup.
### GitHub
Go to [GitHub Developer Settings](https://github.com/settings/developers) → **OAuth Apps** → **New OAuth App**.
Fill in the application details:
* **Application name**: Choose a recognizable name (e.g., "Activepieces SSO")
* **Homepage URL**: Enter your Activepieces instance URL
Copy the **Redirect URL** from the Activepieces SSO configuration screen and paste it into the **Authorization callback URL** field.
Click **Register application** to create the OAuth App.
After registration, click **Generate a new client secret** and copy it immediately (it won't be shown again).
Copy the **Client ID** and **Client Secret** and paste them into the corresponding fields in Activepieces.
Click **Finish** to complete the setup.
### SAML with Okta
Go to the [Okta Admin Portal](https://login.okta.com/) → **Applications** → **Create App Integration**.
Choose **SAML 2.0** as the sign-on method and click **Next**.
Enter an **App name** (e.g., "Activepieces") and optionally upload a logo. Click **Next**.
* **Single sign-on URL**: Copy the SSO URL from the Activepieces configuration screen
* **Audience URI (SP Entity ID)**: Enter `Activepieces`
* **Name ID format**: Select `EmailAddress`
Add the following attribute mappings:
| Name | Value |
| ----------- | ---------------- |
| `firstName` | `user.firstName` |
| `lastName` | `user.lastName` |
| `email` | `user.email` |
Click **Next**, select the appropriate feedback option, and click **Finish**.
Go to the **Sign On** tab → **View SAML setup instructions** or **View IdP metadata**. Copy the Identity Provider metadata XML.
* Paste the **IdP Metadata** XML into the corresponding field
* Copy the **X.509 Certificate** from Okta and paste it into the **Signing Key** field
* (Optional, Cloud) Set the **SSO Domain** to your organization's public domain (e.g. `acme.com`) so users can sign in by entering it on the cloud sign-in page. See [SSO Domain](#sso-domain) above.
Click **Save** to complete the setup.
### SAML with Microsoft Entra ID (Azure AD)
Go to the [Azure Portal](https://portal.azure.com/) → **Microsoft Entra ID** → **Enterprise applications** → **New application** → **Create your own application**.
Name it (e.g., "Activepieces") and select **Integrate any other application you don't find in the gallery (Non-gallery)**.
Open the application → **Single sign-on** → select **SAML**.
Edit **Basic SAML Configuration**:
* **Identifier (Entity ID)**: `Activepieces`
* **Reply URL (Assertion Consumer Service URL)**: paste the SSO URL from the Activepieces configuration screen
Edit **Attributes & Claims** and add these additional claims (leave **Namespace** empty):
| Claim name | Source attribute |
| ----------- | ---------------- |
| `firstName` | `user.givenname` |
| `lastName` | `user.surname` |
| `email` | `user.mail` |
In the **SAML Certificates** section, copy the **App Federation Metadata Url**.
You can paste this URL directly into the **IdP Metadata** field in Activepieces — Activepieces will fetch the metadata XML automatically. Alternatively, open the URL in a browser, save the XML, and paste its contents.
Download the **Certificate (Base64)** from the **SAML Certificates** section. Open the file and copy its contents (including the `-----BEGIN CERTIFICATE-----` / `-----END CERTIFICATE-----` markers) into the **Signing Key** field in Activepieces.
Go to **Users and groups** in the application and assign the users or groups that should be allowed to sign in.
Click **Save** in Activepieces to complete the setup.
### SAML with JumpCloud
Go to the [JumpCloud Admin Portal](https://console.jumpcloud.com/) → **SSO Applications** → **Add New Application** → **Custom SAML App**.
Copy the **ACS URL** from the Activepieces configuration screen and paste it into the **ACS URLs** field in JumpCloud.
 Set the **SP Entity ID** (Audience URI) to `Activepieces`.
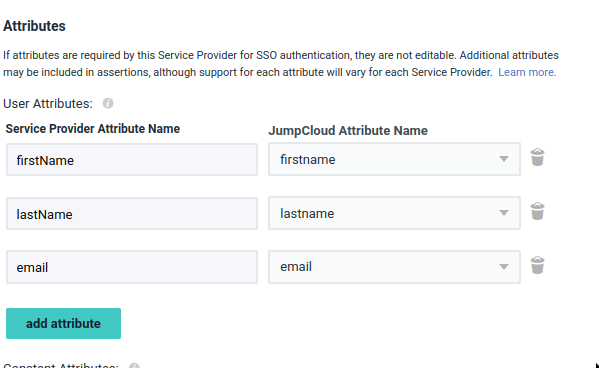
Configure the following attribute mappings:
| Service Provider Attribute | JumpCloud Attribute |
| -------------------------- | ------------------- |
| `firstName` | `firstname` |
| `lastName` | `lastname` |
| `email` | `email` |
Set the **SP Entity ID** (Audience URI) to `Activepieces`.
Configure the following attribute mappings:
| Service Provider Attribute | JumpCloud Attribute |
| -------------------------- | ------------------- |
| `firstName` | `firstname` |
| `lastName` | `lastname` |
| `email` | `email` |
 JumpCloud does not include the `HTTP-Redirect` binding by default. You **must** enable this option.
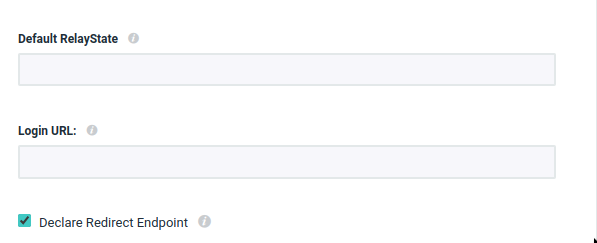 Without HTTP-Redirect binding, the SSO integration will not work correctly.
Click **Save**, then refresh the page and click **Export Metadata**.
Without HTTP-Redirect binding, the SSO integration will not work correctly.
Click **Save**, then refresh the page and click **Export Metadata**.
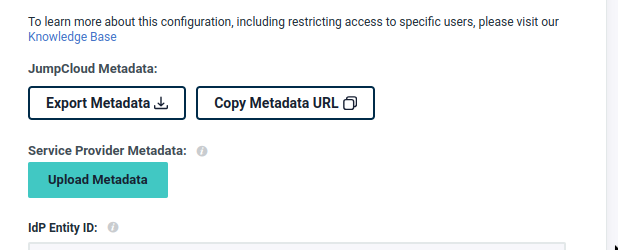 Verify that the exported XML contains `Binding="urn:oasis:names:tc:SAML:2.0:bindings:HTTP-Redirect"` to ensure the binding was properly enabled.
Paste the exported metadata XML into the **IdP Metadata** field in Activepieces.
Locate the `` element in the IdP metadata and extract its value. Format it as a PEM certificate:
```
-----BEGIN CERTIFICATE-----
[PASTE THE CERTIFICATE VALUE HERE]
-----END CERTIFICATE-----
```
Paste this into the **Signing Key** field.
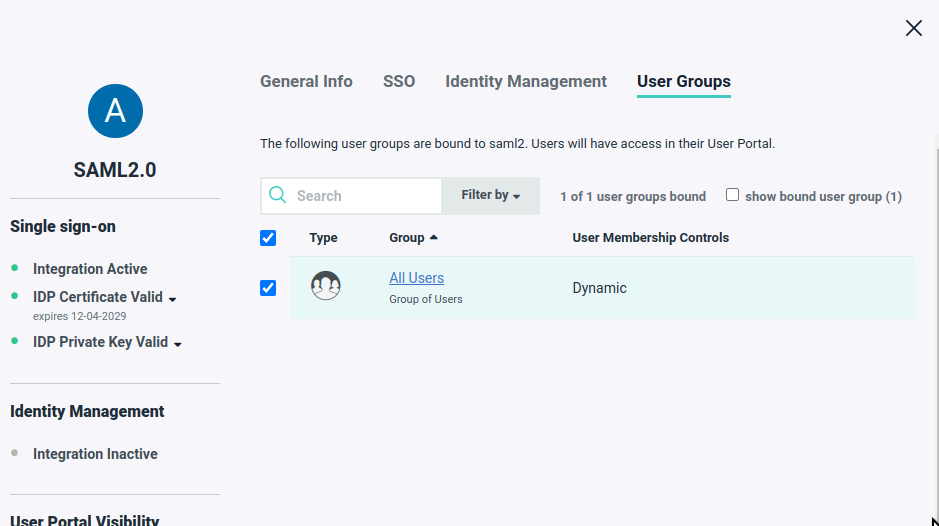
In JumpCloud, assign the application to the appropriate users or user groups.
Verify that the exported XML contains `Binding="urn:oasis:names:tc:SAML:2.0:bindings:HTTP-Redirect"` to ensure the binding was properly enabled.
Paste the exported metadata XML into the **IdP Metadata** field in Activepieces.
Locate the `` element in the IdP metadata and extract its value. Format it as a PEM certificate:
```
-----BEGIN CERTIFICATE-----
[PASTE THE CERTIFICATE VALUE HERE]
-----END CERTIFICATE-----
```
Paste this into the **Signing Key** field.
In JumpCloud, assign the application to the appropriate users or user groups.
 Click **Finish** to complete the setup.
## Troubleshooting
* Verify the redirect URL is correctly configured in your identity provider
* Ensure users are assigned to the application in your identity provider
* Check that email domains match the SSO enforcement settings
* Confirm the IdP metadata is complete and correctly formatted
* If you pasted a metadata URL, make sure it is publicly reachable (Activepieces fetches it server-side)
* Verify the signing certificate is properly formatted with BEGIN/END markers
* Ensure all required attributes (firstName, lastName, email) are mapped
* Enable the HTTP-Redirect binding option in JumpCloud
* Re-export the metadata after enabling the binding
* Verify the binding appears in the exported XML
## Need Help?
If you encounter issues during SSO setup, please contact our enterprise support or [sales team](https://www.activepieces.com/sales).
Click **Finish** to complete the setup.
## Troubleshooting
* Verify the redirect URL is correctly configured in your identity provider
* Ensure users are assigned to the application in your identity provider
* Check that email domains match the SSO enforcement settings
* Confirm the IdP metadata is complete and correctly formatted
* If you pasted a metadata URL, make sure it is publicly reachable (Activepieces fetches it server-side)
* Verify the signing certificate is properly formatted with BEGIN/END markers
* Ensure all required attributes (firstName, lastName, email) are mapped
* Enable the HTTP-Redirect binding option in JumpCloud
* Re-export the metadata after enabling the binding
* Verify the binding appears in the exported XML
## Need Help?
If you encounter issues during SSO setup, please contact our enterprise support or [sales team](https://www.activepieces.com/sales).