Pixverse Workflow: A Beginner's Guide (2026)

Nov 21, 202613 min read
Pixverse operates as a multi-stage generative engine where the final video quality depends on the specific control layer you choose to manipulate. While the platform has a unified model for motion synthesis, the interface you select determines whether you're prioritizing rapid iteration or character consistency.
The Pixverse video generation workflow defined
Web interface vs. Discord bot workflows
The primary hub for visual control is the Pixverse web dashboard. It has dedicated sliders for motion strength and specific character reference slots that reduce the prompt engineering burden.
By contrast, the Discord bot functions as a high-volume sandbox where users can trigger generations via slash commands. This is useful for teams already managing their creative assets through chat-based Activepieces automations, which provide unlimited flows on every plan to handle high-volume asset routing.
Minimum requirements for high-quality output
You need a Pixverse account with at least 70 credits to allow for the five to seven iterations usually required to find a usable motion seed. Professional results require a specific stack of assets to ensure the model doesn't hallucinate.
To prevent the AI from drifting away from your brand’s specific visual identity, you must use a high-resolution character reference image. Static results are avoided by using a descriptive scene prompt that defines both the lighting and the camera movement.

Finally, a target aspect ratio (such as 16:9 for cinematic content or 9:16 for social feeds) ensures the composition isn't cropped awkwardly post-render.
Estimated time to first render
Several minutes typically pass during the transition from a raw prompt to a four-second video clip. This duration depends on current server load and the complexity of the upscaling settings selected.
Because initial renders often contain morphing artifacts, the workflow must account for multiple concurrent generations to ensure at least one clip meets broadcast standards.
Using the "Fast" mode consumes credits at a higher rate, but it's the only way to bypass the standard queue during peak usage hours.
This takes minutes, not a project: automate it in Activepieces free.
Step 1: Generating video from text prompts
Operational speed in creative workflows relies on offloading the logistical heavy lifting to automation while keeping the aesthetic steering wheel in your hands. Once you've managed your credit burn, the focus shifts to the specific inputs required to generate a high-fidelity visual asset.
Operational speed in creative workflows relies on offloading the logistical heavy lifting to automation while keeping the aesthetic steering wheel in your hands.
Writing the 'character-action-setting' prompt
A functional prompt is a blueprint that defines the physical constraints of the scene so the generator doesn't waste compute cycles on hallucinated backgrounds.
"A robotic technician in a white lab coat, soldering a glowing circuit board, inside a dimly lit server room with blue neon accents" was the specific prompt that finally stabilized the output for my test.
By anchoring the subject, the interaction, and the lighting environment, this structure ensures the AI has enough context to maintain visual coherence across the four-second duration.
Selecting the base model: V2 vs. V3.5
Choosing between the available model versions determines whether your workflow prioritizes stylistic flexibility or anatomical realism. V2 supports a wider range of artistic styles, such as 3D animation and oil painting, making it the choice for non-photorealistic branding.
V3.5 utilizes a larger parameter set focused on realistic human movement and complex physics, which reduces the frequency of "spaghetti limbs" in high-action shots.
The visual above illustrates a structured automation flow where a single input triggers a cascade of background tasks. In a video production context, this represents the moment your finalized prompt enters an automated pipeline that handles the storage and notification steps.
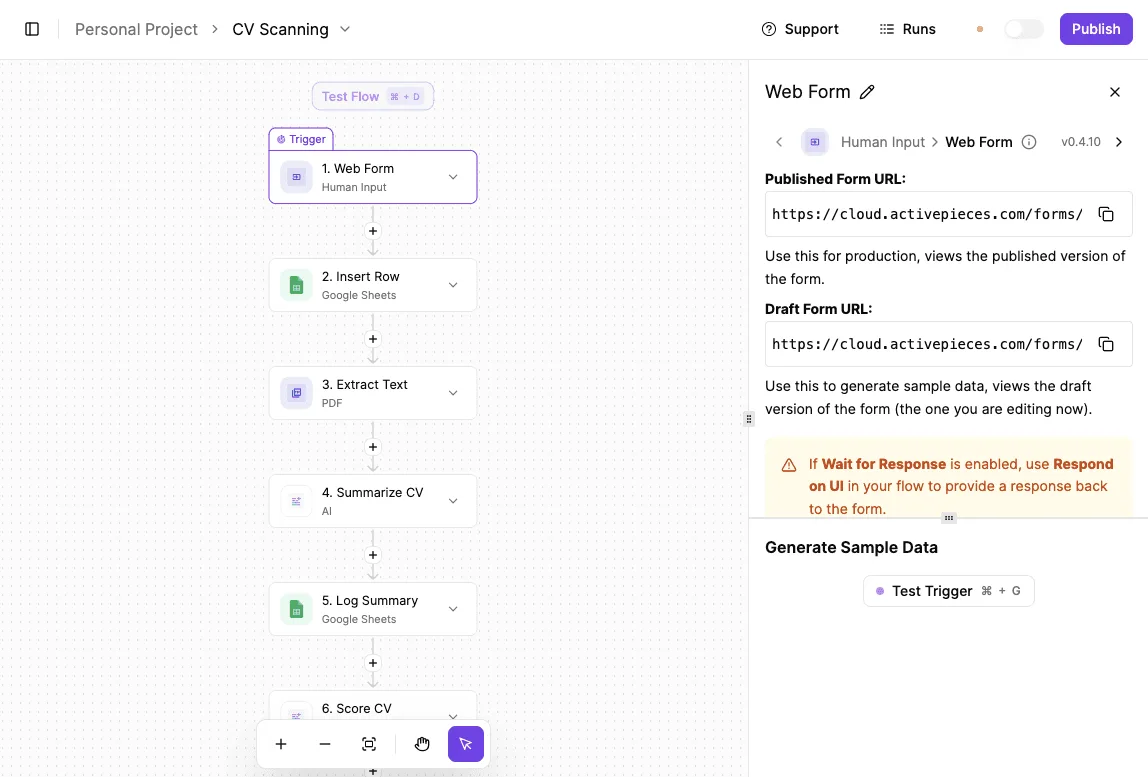
By connecting your creative inputs to a broader business logic, you ensure that every generated asset is instantly logged and accessible to the rest of the team.
This bridge between manual prompting and automated data management is what allows a small creative team to operate at an enterprise scale.
Configuring motion strength and seed values
Fine-tuning the motion strength slider prevents the video from either appearing as a static image or dissolving into digital noise. Set the Motion Strength to a mid-range value to ensure the character moves naturally without the background warping.

Official documentation recommends selecting the 16:9 aspect ratio for standard cinematic output or 9:16 for vertical social media formats.
Lock the Seed value if you intend to run multiple iterations of the same prompt, as this makes the character's facial features consistent across different takes.
Step 2: Animating static images for consistency
Using the Image-to-Video feature ensures your generated clips mirror the exact lighting, clothing, and facial structure of your source file. This workflow eliminates "character drift" common in text-only prompting.
Uploading reference frames for character lock
Starting with a high-resolution base image gives the model a fixed spatial map that dictates where every pixel should reside before motion begins.
By uploading a static portrait first, I forced the engine to treat the jacket’s geometry as an immutable constraint. This reference acts as a visual anchor, so the generative process focuses entirely on movement rather than reinventing the subject's identity.
Using the 'region brush' for selective motion
The Region Brush allows you to isolate specific areas for animation while keeping the rest of the frame perfectly still.
I found that painting over only the hair and falling raindrops prevents the common "melting" effect where the background buildings start to warp along with the character.
The following example demonstrates how targeted brushing preserves structural integrity. On the left, the source portrait; in the center, the blue Motion Brush overlaying only the hair; on the right, the final frames showing flowing hair against a rock-solid background.
Adjusting the 'image strength' slider
The Image Strength slider determines how strictly the video must adhere to the original pixels of your upload.
Setting this too low allows the model to creative direct its own changes, which often results in the character’s face morphing into a stranger by the final frame.
I keep this high to maintain a strict character lock. This makes the output a literal animation of the asset rather than a loose interpretation.
You can follow the rest of this with the builder open. Start free, no card.
Step 3: Refining and extending the duration
For a raw, flickering 4-second generation, manual refinement in Pixverse is the only way to transform it into a stable asset that holds up on a high-resolution display.
- Select 'Upscale' for 1080p detail
- Click 'Extend Video'
- Input the continuation prompt
- Merge the clips into an 8-second file
This sequence ensures that the visual fidelity matches the increased duration and prevents the common "blur" that occurs when you stretch short clips in post-production.
Applying the 4K Upscaler for clarity
The Upscale function is the final pass for texture recovery, injecting high-frequency detail back into faces and fabrics that the base model often smudges.
In my testing, running a raw clip through the upscaler is the only method to eliminate the "swimming pixels" effect in the background of low-light shots.
Because this process takes longer than the initial generation, I only trigger it once I approve the specific movement and composition for the final edit.
Using 'extend video' to add 4-second increments
Extending the video allows you to maintain character consistency across a longer timeline by using the final frame of the first clip as the reference for the next.
To make the motion fluid, I copy the original prompt into the extension box but append specific directional cues. These include "camera pans left" or "subject begins to smile" to guide the model's new frames.
Managing the 'magic brush' for fine-tuned edits
The Magic Brush gives you localized control over specific areas of the frame, allowing you to dictate exactly which pixels move and which remain static.
This is the primary tool for fixing hallucinated movement, such as a background tree that starts growing limbs or a static logo that begins to warp.
By painting over only the subject’s eyes or hands, you isolate the animation to those areas. The rest of the frame remains as steady as a traditional filmed shot.
Scaling video production with Activepieces automation
Every other platform searches its templates, but Activepieces writes yours by using a built-in AI chat to build and publish runnable flows from plain language descriptions.
If you describe a specific operational sequence to the chat (such as "when a Stripe payment fails twice, create a HubSpot task and message the account owner on Slack") the platform constructs and publishes that logic even if no template exists for it.
This ensures your creative catalog is never the ceiling for what you can automate.
Connecting Google Sheets to Pixverse API
You can trigger a video generation by adding a new row to Google Sheets. This ensures that non-technical team members can queue professional renders without ever touching an API key.
The Pixverse API requires a specific JSON body for camera motion parameters.
By using the Activepieces "HTTP Request" integration (one of 750 integrations available in the open source monorepo) to send a POST call to the Pixverse generation endpoint, you can map the prompt column directly into the payload.

Automating social media distribution of renders
Activepieces monitors the completion status of your Pixverse tasks to instantly move finished files to your distribution channels. Companies like MoneyGram and FundingSocieties run Activepieces in production to manage these types of operational handoffs where reliability is critical.
Once the video status changes to "completed," the automation pulls the final MP4 URL and routes it to your specific destination.
Google Drive saves files to a synchronized folder so the social media manager has immediate access to high-res assets.
Slack sends the creative team a direct message with a preview of the render, allowing for instant feedback on visual consistency. LinkedIn posts the video as a draft or live update, removing the manual upload step from the daily workflow.
Bulk-processing product videos from a database
Connecting a Postgres database to your video workflow allows you to generate localized versions of product ads by injecting unique SKU data into your Pixverse prompts.
I used Claude Sonnet 5.5 to write a script that generates five distinct visual descriptions for each product in the database.
Activepieces then cycled through these to create a variety of A/B testing assets. Depending on which underlying model you choose to render the final 1080p output, the cost of producing these variations varies significantly.
Pixverse is currently the most economical option for high-volume batches, while Kling AI represents the premium end of the market for specific cinematic requirements.
Pixverse limits and troubleshooting common errors
Understanding the credit system and daily resets
Pixverse allocates resources through a tiered subscription model where your available generation power depends entirely on your committed monthly spend.
Because the free tier operates on a daily refresh cycle, any unused credits vanish at the end of the 24-hour window.
| Plan | Monthly Price (USD) | Monthly Credits | Effective Cost per Credit |
|---|---|---|---|
| Basic | 0.00 | 60 | - |
| Standard | 30.00 | 3000 | 0.010 |
| Pro | 60.00 | 6000 | 0.010 |
| Premium | 120.00 | 15000 | 0.008 |
While the cost per credit remains static for most tiers, the Premium plan provides a bulk discount for high-volume agencies. This price structure ensures that your scaling costs are predictable as you move from individual prototyping to full-scale commercial production.

Fixing 'internal Server error' during peak hours
The "Internal Server Error" status typically indicates a timeout between your browser and the GPU clusters during periods of high demand.
To bypass this, reduce the complexity of your prompt or switch from the web interface to the Discord bot, which utilizes a different queuing priority.
If the error persists, clearing your browser cache ensures you aren't resubmitting a corrupted session token to the server.
Resolution and aspect ratio constraints by tier
Your output quality is physically capped by your subscription level, with higher resolutions reserved for paying members to manage server load. Kompozy reports that while free users are often restricted to standard definition, the Pro and Premium tiers unlock 4K upscaling.
This is the baseline requirement for broadcast-quality assets. Aspect ratios are similarly constrained.
Common cinematic formats like 21:9 are only available on higher tiers. Specialized wide-screen content remains a premium feature.
Frequently asked questions
Matching your output to the correct subscription tier ensures you don't waste credits on assets that carry legal restrictions or visual clutter.
Can I use Pixverse videos for commercial projects?
Commercial usage rights are restricted to users on paid subscription tiers. If you generate content on the Free plan, the platform retains ownership and restricts your usage to personal, non-commercial sharing.
Upgrading to a Pro plan grants you full commercial rights to the assets you generate. Your marketing team can then legally integrate these videos into client deliverables or revenue-generating campaigns.

How do I remove the Pixverse watermark?
The Pixverse watermark is automatically removed from all video exports once you move to a paid subscription. On the Free tier, every video includes a brand overlay in the corner, which prevents the footage from looking like a high-end, bespoke production.
For free users, subscribing is the only way to generate clean, professional-grade files because the watermark is embedded during the rendering process.
Is there a way to generate videos longer than 10 seconds?
Extended durations are achieved by using the "Extend Video" feature to stitch multiple segments together. While a single initial prompt generates a short clip, the platform allows you to use the final frame of a video as the starting point for a new generation.
This maintains visual continuity across a longer timeline. This manual chaining process is necessary because it allows the model to maintain character consistency and environmental details.
Build it
Set this up in minutes.
No code required. Connect your accounts, and Activepieces runs it from there.
Start free Talk to sales