How to Create AI Agents in Minutes: Quick Guide
Ashraf Samhouri
Dec 1, 202512 min read

Every day, more companies rely on AI agents to complete tasks that once needed constant attention from people. These agents can handle time-consuming routine tasks, answer customer queries, and even provide information about your business so your team can focus on bigger goals.
Not long ago, building AI agents required advanced machine learning skills, knowledge in programming languages, and complicated systems. That's not the case anymore.
This article will walk you through the following: what AI agents are, the steps for building effective agents, and how Activepieces makes the process easier.
What Are AI Agents? Understanding the Core Principles
An AI agent is basically a program that assesses the situation to determine necessary actions, and then actually does them. That's the difference between an ordinary bot and an agent - a bot just follows a script, but an agent adapts depending on the situation.
These work through a loop called OPA: observation, planning, and action.
First, it takes in some input, such as a message from a user, data from a system, or even a live feed from sensors. Then it plans, which means breaking the job into steps and picking the right tools.
Sometimes, that even includes creating a little conversation flow so it can be used to talk to someone in a way that makes sense. After that, it acts. That might be sending an email, updating a database, or passing part of the job to another agent.
You see this in practice every day:
- Support agents who handle tickets
- Supply chain agents that reorder stock
- Autonomous agents that help run self-driving cars
There are also agent platforms that let you build and track these agents with dashboards, so you can actually see how well they are working.
Why Build AI Agents
Many businesses build AI agents since they can do things that regular software can't.
Traditional programs usually just follow a fixed set of rules. You give them an input, they follow the script, and that's it.
An agent, on the other hand, has the capabilities to take in what's happening, plan out the next steps, and act alone.
Even when you run an agent 24/7, it doesn't get tired and doesn't make the same mistakes people often do. In supply chains, for instance, an agent watches stock levels, predicts shortages, and reorders items before you even notice an issue. That's inventory management done automatically.
And you don't always need heavy infrastructure to set them up anymore. With newer tools, you can get started quickly, build agents that fit your needs, and keep scaling as your business grows.
6 Steps to Build AI Agents With Activepieces
Follow these in order, and you'll be able to create agents that handle well-defined tasks and fit smoothly into existing workflows.
Step 1: Sign Up and Log In
The first step is, of course, to sign up on Activepieces. Once you sign up and log in, you'll land on a user-friendly dashboard, where the building begins.
At this stage, it helps to know which plan fits your needs. Activepieces offers a few pricing paths, so you can pick what fits your work.
The Standard plan starts free. You get ten active flows, plus unlimited runs, AI agents, tables, MCP servers, and email support. After that, the cost increases to $5 per active flow per month.
When you want stronger control, you can contact sales and move to the Ultimate plan. It adds:
- Security rules
- Support for team and personal projects
- Access controls for each piece
- Global connections
- Custom roles
- SSO
- Audit logs
- Full set of API options to manage billing and admin tasks
Activepieces also offers the Embed plan that starts at $30k per year for companies that want to place automation and AI agents inside their own product. It includes a JavaScript SDK, custom templates, private pieces, and dedicated help.
There's also a free, open-source Community Edition you can self-host if you want full control over your data and server resources.
Compared to Zapier or Make, where costs climb with task counts, Activepieces keeps pricing flat and predictable.
Try Activepieces for free and launch your first automation today!
Step 2: Open the Agents Tab and Create a New Agent

After logging in, navigate to the "Agents" tab and click on "New Agent" on the right side of your dashboard. This is where all the building happens. Think of it as a workspace for creating, testing, and managing your AI agents in one place.
Rather than writing the same instructions in every workflow, you can store them here and reuse them whenever needed. Each agent gets its own profile with a name, description, and a clear mission that defines what it should do.
The tab also lets you test outputs before going live, so it's easier to fine-tune your setup. From automating customer support to building content workflows, the use cases you can cover start right here in the "Agents" tab.
Step 3: Name and Describe the Agent
When you set up a new agent in Activepieces, you'll want to give it a name that makes sense right away.
Naming it something like "Customer Support Agent" or "Blog Writer" helps you and your team avoid wasting time figuring out what it's for. That becomes even more important once you have a few agents running in the same account.
The description is where you set the mission. You can write out:
- Who is the target audience for this agent?
- What position should it take on?
- How should it act?
For instance, "Act as a support assistant for customers who submit technical issues." That single sentence already gives the AI a clear direction.
Adding detail in the description also keeps it focused. You're giving the system relevant information so it doesn't wander into tasks you don't want it to touch.
Later, when you look at logs or need to debug, a clear name and description make it easy to see what happened and which agent did the work.
Step 4: Add Instructions
Inside the setup screen, you'll find a text area where you type instructions. That's where the agent gets its purpose, scope, and behavior.
The most successful implementations focus on specific, well-defined tasks, so don't overload the agent with too many goals at once. For example, a customer support agent might only classify tickets, respond with short answers, and escalate urgent ones.
In a few lines of clear text, you can lock in the agent's role and tone. Something like, "You're a support bot who answers questions in a friendly but concise style. When the query is technical, send it to the IT team," gives enough structure to keep results consistent.
Prompt engineering matters here. The way you phrase the role shapes how the model processes requests and decides which tools to use.
Action verbs such as "categorize," "summarize," or "draft" make the guidance direct and easier to follow. After writing your first draft of instructions, run a quick test, see how it responds, and adjust if the output isn't where you want it.
Step 5: Add Tools
Click "Add Tool" and choose either "piece" to pick from over 502 integrations or from "flow" to turn an existing workflow into a tool your agent can use.

The option depends on what your agent needs to do or the user's preferences. Some setups call for certain tools like Google Sheets or Gmail, while others might rely on custom flows.
From Piece
Connect your agent to the apps and services it needs. In Activepieces, these integrations are called "pieces," and right now, there are 502 ready to use.
You can access tools across almost every category, such as:
- OpenAI
- WooCommerce
- ElevenLabs
- Microsoft Excel 365
- Google Sheets
- Motion
- Slack
- Discord
- ClickUp
- WordPress
- ActiveCampaign
- Zoho CRM
- Stripe
Since Activepieces is open source, the community contributes new pieces all the time, which means the library keeps expanding. Developers can even design their own in TypeScript and push them into the ecosystem.
On top of that, it takes an AI-first approach, so your agents can tap directly into these pieces to build smarter workflows.
In short, pieces are the bridge between your agent and the apps it needs to get real work done.
From Flow

Once your agent is ready, bring it into a workflow. Start by creating a new flow from the dashboard. Add a trigger, which is the event that kicks things off. For example, you can use a Zendesk "New Ticket" trigger or a webhook from another app.
Add an "Agent" step to the flow. Choose the agent you just made, then fill in the input field to tell the agent what to do with the data coming from the trigger.
After the agent does its job, chain more steps. If the output is "Billing Problem," you could route it to a finance tool. When it's "Technical Issue," maybe create a task in your dev tracker.
Finally, run a test. Check how the agent behaves with real data. If you notice it doesn't perform the way you want, go back to its instructions or permissions and refine them.
Over time, you'll shape an agent that consistently delivers the right results.
Step 6: Deploy and Refine Your Agent
The deployment starts when you add it to a flow and connect it to the right inputs and outputs. For example, you might feed new data from a Google Sheet into your agent with the prompt, "Draft a personalized email for (prospect_name)."
From there, link its output to the next step, like sending the draft through Gmail. Run a quick test to confirm it's pulling the right input and producing the response you want.
After you launch the AI agent to start interacting with users, the real work begins. Refinement comes from observing how it performs in live runs. Review logs to spot gaps, such as observed errors during data processing, and use that insight to adjust instructions or tool usage.
Collect user feedback afterward to refine your AI agent, especially in customer-facing workflows, since this highlights where clarity or tone needs improvement.
Example of Agents You Can Build Today
Below is an example of an AI agent you can build today using Activepieces.
AI-Written Reminders
Sending reminders manually takes time, especially if you're managing a long list of subscribers. With Activepieces, you can automate the process so every customer gets a timely, personalized message.
Steps to build it in Activepieces:
Add a trigger that runs weekly or monthly based on your needs.

Connect your Google account and select the right file.
Pick the start row, usually row 2 if row 1 has headers.
Decide the group size for how many rows you want to process at a time.
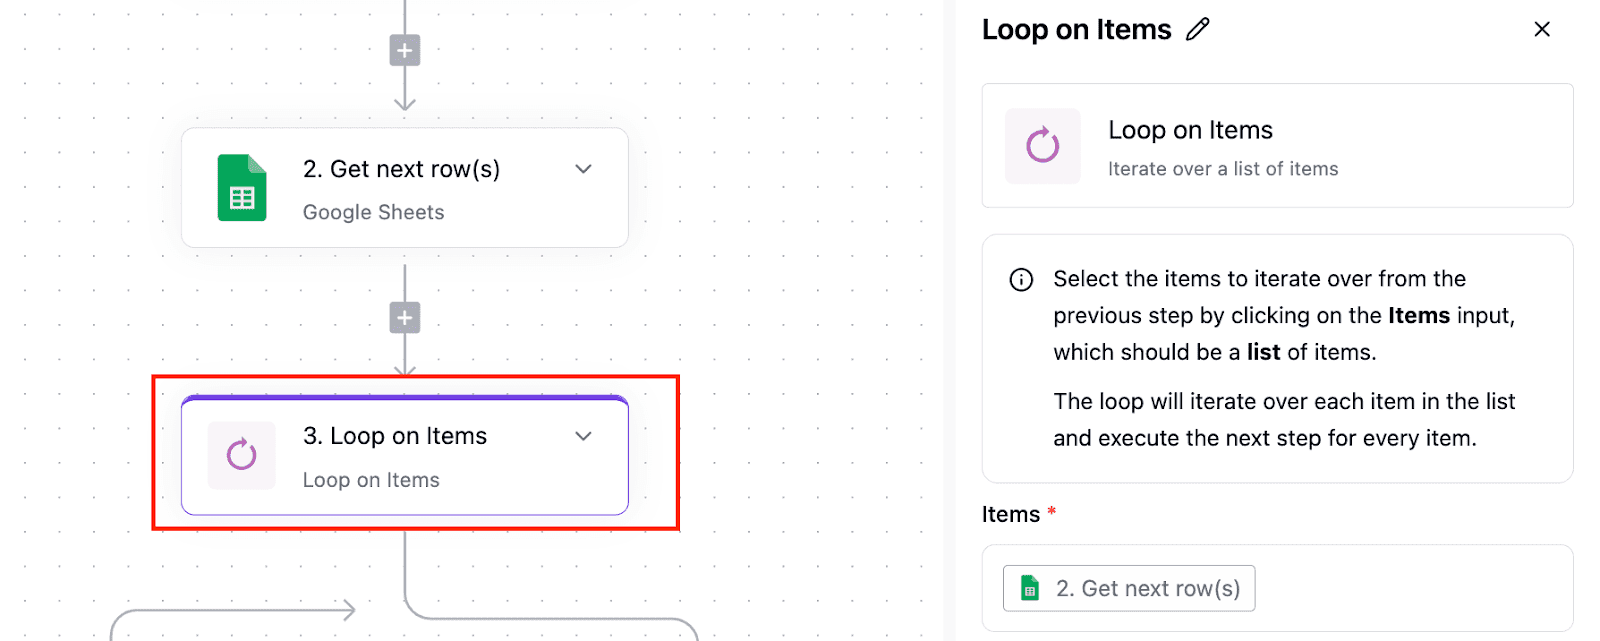
Loop through each row so the flow handles every user in sequence.
Add a Text AI step and choose an AI provider like OpenAI.

Write a prompt that generates reminders using details such as the customer name and renewal date.
Test the step to make sure the AI creates clear reminders.
Connect your email provider for delivery.
Run a final test before going live.
Once set up, the system runs on its own. The agent reads the data, writes tailored reminders, and sends them on time.
Create AI Agents That Deliver Real Results With Activepieces
Activepieces helps you build agents that actually deliver results without all that overwhelming manual work.
Right now, there are 502 integrations available, and that number grows every day as the community contributes new ones. You're not limited to a small set of apps, so your agents can connect with whatever your business depends on.
For beginners and non-technical teams, the no-code builder means anyone can set up a flow in minutes. For developers, every piece is written in TypeScript, which means you can fully customize and even hot reload changes while building.
You can further create agents that integrate with the built-in AI pieces, and even use AI Copilot inside the builder to guide you step by step. For security, you can self-host for maximum data control or go to the cloud.
In short, Activepieces helps you cut manual tasks, save costs, and run smarter automations that grow with your business.
FAQs About How to Create AI Agents
How do I create my own AI agent?
You start with one clear task you want the agent to solve. Pick the input it will read, write simple instructions, then connect it to tools so it can act in a real-world setup.
Most people use a visual builder because it offers more speed and removes many limitations. You can also add an image input or let the agent generate a combination of different media if your website needs that feature.
A small test run helps you measure output quality before you go live. A focused plan gives you the best chance of success.
Can I build AI agents without coding?
Yes. Many platforms guide you through the setup, so beginners avoid deep Python or Java work. The steps feel simple because you move through a clear flow without restarting each time something changes.
How much does it cost to create an AI agent?
The cost stays low when you use a visual builder. You only pay for the flows you run, which fits small teams and people who want to test ideas before heavy development.
Can I create an AI on my own?
Yes, you can create an agent alone if you follow clean outlines for tasks and keep the scope small while you're diving into the concept.
What are the things to consider when building an AI agent?
Think about input, tools, data access, and the job you want the agent to own. You should also look at privacy rules, storage, and the databases the agent will touch. These essential points determine how far your agent can go.
Which programming language is needed for AI agent development?
You can build agents without code, but developers often pick Python or Java when they want to customize actions or connect deeper systems. Both languages help you develop features that need more control or heavier logic.

Written by
Ashraf Samhouri